If you’ve spent any amount of time developing mobile apps, you’re probably well aware of how public “private” data really is. Cloud databases like , , and protect their front gates with robust security measures like authentication keys, security rules, user roles, and field-specific restrictions. From the outside, these databases are fortresses with more than enough artillery to prevent people from seeing each other’s data.
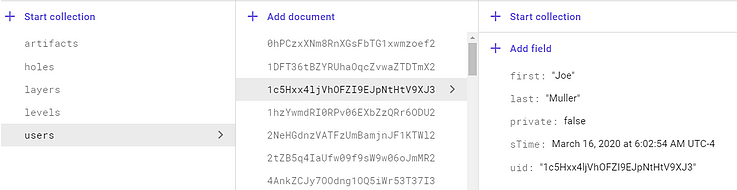
The issue however, is that the castle-keepers can see everything that gets brought into the castle. Your name. Your contact info. Your personal information. It all exists on a database that is not absolutely private and that should give you pause. Below is a screenshot from a test app I made using Google’s Firestore as a database and yeah…as the owner of the database I can peruse the user records at my leisure.
Fortunately, The @ Company has developed a revolutionary solution for this privacy dilemma. Data secured using their @protocol is visible to you and the people you explicitly give access to. That’s it. Even if I created a social media app used by 4 million people, the only personal information I’d be able to access is my own. You can read more about this Absolute Privacy here.
The Goal
Series
In this series of articles, I’ll be explaining how to build an app using the @protocol. We’ll be covering the basics that all @pps will need:
- Authentication (this article)
- Sending and Receiving Data
- Controlling Data Visibility
For simplicity purposes, we’ll be building a list-focused @pp that will allow us to create and share (wish, bucket, to-do) lists with other @signs. All of this code will be available on GitHub so you can extend it however you’d like.
Authentication
This article specifically will focus on authenticating people using the @protocol.
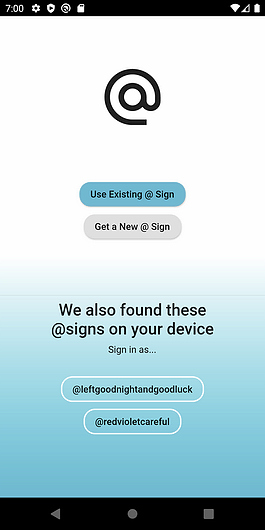
- If they have an existing @sign, we want them to be able to log in with that by either selecting a key file from their device or by scanning a QR code
- If they don’t have an @sign, they should be able to acquire one from the @ Company’s website
- If they’ve already logged in with another @sign, we should give them the option to log in with that
The final login screen is shown here →
Setup
The @protocol is still young and a lot of it’s associated packages are still in the dev phase so some of the pubspec.yaml imports will reference their GitHub repos.
Android
The atsign_authentication_helper package depends on com.android.tools.build:gradle:3.5.0 so add this piece to your android/build.gradle file:
dependencies { classpath 'com.android.tools.build:gradle:3.5.0' }
atsign_authentication_helper
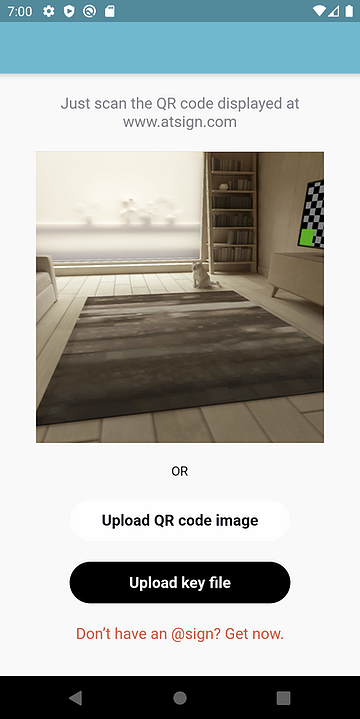
In order to authenticate new people, you’ll need them to either scan an existing QR code or select their @sign key files using a file picker. You can design your own method for doing this (which would involve setting up a camera, scanning a QR code, verifying the @sign exists, setting up a file picker, unzipping a key file, and syncing the onboarding result with your app’s AtClientService) or you can use the atsign_authentication_helper package which was designed to take care of the process for you. In short, the package comes with a fully built-out onboarding screen that looks something like this:
You can import packages directly from GitHub if you need the code from a repo that isn’t published on pub.dev or if you need code from a specific branch of a published repo.
In our case, we need code from the dev_env branch. Add the following to your pubspec.yaml file and then follow the setup instructions on the packages Readme page.
atsign\_authentication\_helper:
  git:
    url: [https://github.com/atsign-foundation/at\_widgets.git](https://github.com/atsign-foundation/at_widgets.git)
    path: atsign\_authentication\_helper
    ref: dev\_env
AtConstants
In order to specify what server your app should connect to, you’ll need to reference the ‘root.atsign.org’ domain. You can either include this somewhere in your app as a static variable or you can create an AtConstants class like they do in the atsign_authentication_helper example project. As you can see, this class also contains a few other useful strings.
class AtConstants {
  static const String _WEBSITE\_URL_ \= 'https://atsign.com/'; // for local server
  //static const String ROOT\_DOMAIN = 'test.do-sf2.atsign.zone';
  // for staging server
  // static const String ROOT\_DOMAIN = 'root.atsign.wtf';
  // for production server
  static const String _ROOT\_DOMAIN_ \= 'root.atsign.org'; static const String _TERMS\_CONDITIONS_ \= 'https://atsign.com/terms-conditions/';
  static const String _PRIVACY\_POLICY_ \= 'https://atsign.com/privacy-policy/';
}
Peripheral Packages
In addition to the package above, I’ll also be using a number of others when building this app. You can find links to each of these below:
- stacked — MVVM state management architecture for Flutter
- stacked_themes — Theme manager
- observable_ish — Observable state tool for reactive frameworks
- auto_route — Code generator for navigation
- get_it — Dependency injection/service locator
- injectable — Code generation library for get_it
- Hive — Local, key-value database
The AtProtocolService
In the at_list app, I’ll handle all of the @protocol related logic in an AtProtocolService class. I’ll be using the injectable package to designate this class as a singleton so that I only ever have one instance of the AtClientService and AtClient. Here’s the full class:
This class admittedly does a lot but it’s generic enough to plug into any @pp you’re working on and give you all the basic functionality you need. At the top, it creates variables to hold the AtClientService, the AtClientImpl, the AtClientPreferences, the person’s @sign, a list of on-device @signs, and the keychain manager. Here are some brief descriptions of the main functions.
onboard()
The onboard() function is run each time the app is opened and it creates the AtClientService needed to do just about everything with the @protocol. Then it creates an AtClientPreference object that’s used to actually onboard the given @sign. By default, this method uses the last @sign the person logged in with and that’s fine because that behavior is what people would typically expect.
At this point it seems relevant to explain what “onboarding” actually is. If you look at the code for the AtClientService class, you’ll see that the onboard() method does a few things before sending the back a boolean to the caller.
- Gets the primary @sign from the keychain manager OR formats the specified @sign
- Gets the private key for the @sign from step 1
- Creates an AtClient from the given @sign and the AtClientPreference object
- Performs cram and pkam authentication with the Remote Secondary Server
- Stores the person’s encryption keys locally
If all of this completes without error, the onboard() method returns true. If not, a specific error will be thrown wherever the process broke down and you can get to troubleshooting why it happened.
getAtSign()
The getAtSign() method is much more straightforward than the onboard() one. Basically, it gets the currently authenticated @sign from the AtClientService. The only reason I mention it here is to point out that I’m calling it at the end of the onboard() method once everything has completed successfully. The result (the person’s @sign) is stored in a String variable so the rest of the app can use it. The String does contain the”@” symbol.
getAtSignList()
Each time a new @sign is onboarded to your app, the @sign is saved on the device’s keychain (iOS) or keystore (Android). Behind the scenes, the at_client_mobile package uses the flutter_keychain package to manage these entries. All I’m doing in this method is tapping into the existing KeyChainManager class included in the at_client_mobile package to get a list of the available @signs. This method is called in the main() class so the list is available at sign in.
makePrimary()
The last method of significant importance is the makePrimary() method. At any time, the AtClientService can only handle a single @sign. This @sign is considered the primary @sign and it will appear first in the list of @signs returned by the keychain manager. When a person returns to the app after closing it, they will be onboarded as the primary @sign. In case they want to switch the default @sign, you can use the makePrimary() method to do exactly that. In the At List app, I call the makePrimary() method just before onboarding again:
OutlineButton(
  borderSide: BorderSide(width: 2, color: Colors._white_),
  child: Text(‘$sign’),
  shape: RoundedRectangleBorder(
    borderRadius: BorderRadius.circular(16),
  ),
  onPressed: () async {
    await atProtocolService.makePrimary(sign);
    await atProtocolService.onboard().then((success) {
      if (success) {
        ExtendedNavigator._of_(context) .replace(Routes._homeView_);
      } else {
        Scaffold._of_(context).showSnackBar(SnackBar(
          content: Text(‘Sorry…something went wrong’), )
        );
      }
    });
  })
If the new @sign is successfully onboarded, we follow the same routing logic as before and send them to the HomeView.
Onboarding People
The AtProtocolService from above doesn’t do us much good on it’s own. The next step is to create a dynamic pathway into our app that knows if the person is already @signed in. If they are, we’ll send them straight to the HomeView (the first real screen of the app). If not, we’ll send them to the SignInView where they can choose the @sign they want to use or get a new one.
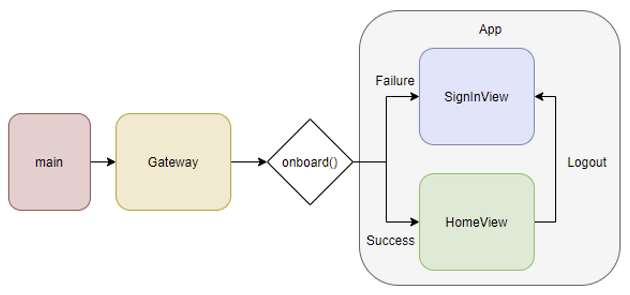
Each section of the diagram above is broken down below.
Main
As always, main() is the entry point to our app. Since the methods here are called before the rest of the app boots up, we can do any sort of initialization that’s necessary for later.
Future<void> main() async { WidgetsFlutterBinding._ensureInitialized_(); configureDependencies(); // Creates all necessary services for get\_it await Hive.initFlutter(); // Initialize Hive DB for future use await initializeServices(); // Perform service specific setup (open Hive boxes) await ThemeManager._initialise_(); // Setup for using stacked\_themes await atProtocolService.setup(); // Get any @signs from the keychain manager
runApp(Gateway());
}
Gateway
The Gateway class is simply a StatelessWidget that uses a FutureBuilder to determine if the person has completed onboarding yet. In summary, we wait on the onboard() function from our AtProtocolService to complete and route the person based on the result. A result of ‘true’ means onboarding was a success.
class Gateway extends StatelessWidget { @override   Widget build(BuildContext context) { return FutureBuilder<bool>(
  future: atProtocolService.onboard(),
  builder: (context, snapshot) {
    if (snapshot.hasData) {
      if (snapshot.data) {
         return App(
            initialRoute: Routes._homeView_,
         );
       } else {
          return App(initialRoute: Routes._signInView_);
       }
    }
   else if(snapshot.hasError){
     return App(initialRoute: Routes._signInView_);
   }
   else {
     return Center(
       child: CircularProgressIndicator());
     }
   });
} }
App
The final piece in the sequence is the actual App (MaterialApp). Using the initial route provided by Gateway(), we tell our ExtendedNavigator from the auto_route package where to go — either the HomeView or the SignInView.
class App extends StatelessWidget {
  final String initialRoute;    const App({Key key, @required this.initialRoute})
   : super(key: key); @override   Widget build(BuildContext context) {
  return ThemeBuilder(
     lightTheme: lightTheme,
     darkTheme: darkTheme,
     defaultThemeMode: ThemeMode.light,
     builder: (context, regularTheme, darkTheme, themeMode) {
       return MaterialApp(
          debugShowCheckedModeBanner: false,
          themeMode: themeMode,
          theme: regularTheme,
          darkTheme: darkTheme,
          builder: ExtendedNavigator._builder_(
            router: AppRouter(),
            navigatorKey: atProtocolService.navKey,
            initialRoute: initialRoute,
            builder: (context, child) {
              return child;
            },
           ),
         );
        },
       );
    } }
SignInView
For brevity, I won’t include the entire SignInView class here but you can find it in the repo. I will dive into the important parts though, the first being the ScanQrScreen provided by the atsign_authentication_helper package. To use it, all you have to do is navigate to it and send along the applicable @protocol pieces:
RaisedButton(
  child: Text('Use Existing @ Sign'),
  color: Theme.of(context).primaryColor,
  shape: RoundedRectangleBorder(
      borderRadius: BorderRadius.circular(16)),
  onPressed: () async {
    await Navigator._pushReplacement_(
      context,
      MaterialPageRoute(
         builder: (context) => ScanQrScreen(
            atClientServiceInstance: atProtocolService
                     .atClientService,
            nextScreen: HomeView(),
            atClientPreference:
              atProtocolService.atClientPreference,         ),
         ),
     },
),
The implementation shown here uses the generic Navigator but you can make the whole thing look a tad cleaner by adding the ScanQrScreen to your AutoRoute list:
@AdaptiveAutoRouter(
  routes: <AutoRoute> \[
    AutoRoute(page: HomeView, initial: true),
    AutoRoute(page: SignInView,),
    AutoRoute(page: ScanQrScreen)
  \]
)
Then use the auto_route ExtendedNavigator as per usual:
RaisedButton(
  child: Text('Use Existing @ Sign'),
  color: Theme.of(context).primaryColor,
  shape: RoundedRectangleBorder(
      borderRadius: BorderRadius.circular(16)),
  onPressed: () async {
    await ExtendedNavigator.of(context).replace(
      Routes.scanQrScreen,
      arguments: ScanQrScreenArguments(
          nextScreen: HomeView(),
          atClientServiceInstance:
              atProtocolService.atClientService,
          atClientPreference:
              atProtocolService.atClientPreference),
    );
  },
),
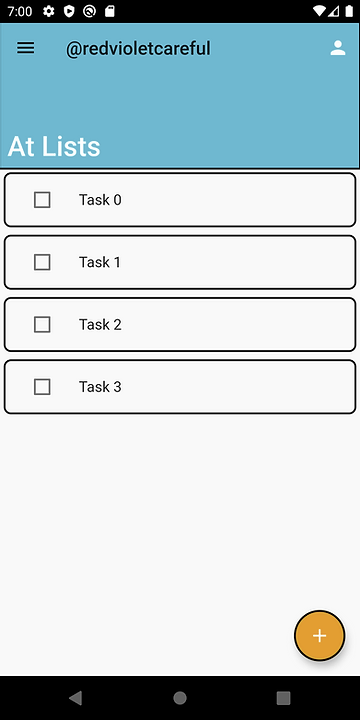
HomeView
Again, the contents of the are not important for this article but you can find the code in my repo. Once you successfully onboard with a new or existing @sign, you’ll arrive at the screen below. Your @sign should show in the app bar.
Conclusion
This is a great start! Without being authenticated, we wouldn’t be able to do much inside our @pp. The setup above allows us to authenticate and remember people on real @ servers. In the next article, we’ll start to explore basic CRUD operations using the @protocol so that we can privately share data between people. We’ll also learn how to retrieve data from other @ namespaces so that for instance, information added to the person’s @persona profile can be seamlessly integrated into your @pp. This is one of the other exciting things about the @protocol: everything is part of a secure information ecosystem. People’s data no longer has to be siloed away in 20 different applications…but more on that later!
At List
The entire code base for this project can be found on my at_list repo. It’s a work in progress so it’ll change as time goes on but the idea is to keep it simple enough where it can be forked and refactored without using that much brainpower. I’m also open to any feedback and suggestions so reach out or open a new issue on the repo if you find something that looks out of place.
References
- @protocol Documentation
- atsign_authentication_helper
- at_hello_world
- The elegant simplicity of the @protocol
- Data Encryption & Caching with the @protocol
Originally published at https://www.mullr.io on January 24, 2021.
Follow Flutter Community on Twitter: https://www.twitter.com/FlutterComm