Build this Blog
Medium. Hashnode. Wordpress. Ghost. Log Rocket.
There are a thousand blogging platforms that want your content, knowledge, and time. I say nay! In this article I’ll lay out all the steps you need to build this exact website and host your content on GitHub pages.
What you’ll get:
- A blogging website hosted on GitHub
- The Hugo PaperMod theme
- Menus to filter content by categories and tags
- Full text search
- Tracking with Google Analytics

Steps
Create your Site
Github allows individuals to create one free site per account. Luckily, that’s all we need!
- Create a new repository
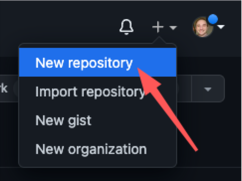
- Name the repository <your username>.github.io
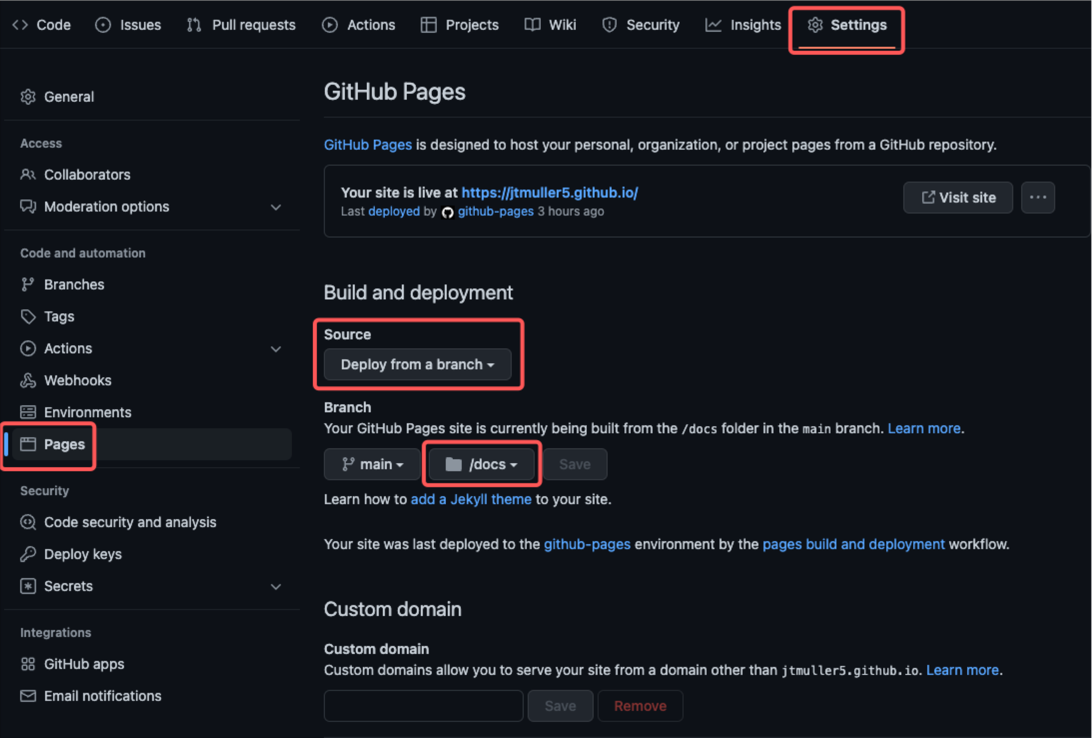
- Navigate to the settings tab and select the Pages section
- Configure the site to “Deploy from a branch” and select the “/docs” folder
The official GitHub pages tutorial can be found here.
Create a New Blog Post
Now that you have the repo setup, we can start adding content.
As a rule of thumb, each blog post should be stored in its own folder since a post may consist of a markdown file and a bunch of images. Each time you add an image to a post it will be stored in the same folder as the .md file.
hugo new content/posts/build_this_blog/build_this_blog.md
Add Images
Images can be added to blog posts by adding them to the static folder and then referencing them as if you were in the static folder. For example, if you have an image called test.png, you can add it to static/test.png and then reference it like so: 
Import Posts from Medium
If you’re arriving at this article after writing a handful of posts for other sites, you’re first order of business should be to move your blogs from there to here.
I personally did most of my writing on Medium before making the move so the majority of my content migration was done using the medium-to-markdown CLI. To get started:
- Ensure you have npm installed
- Run the following:
npm i medium-to-markdown - Create a new directory to hold the markdown content
- (Optional) Uncheck the box to Meter your story on Medium
- cd into the directory where the medium-to-markdown package was installed
- Run the following command:
npm run convert <URL_TO_YOUR_MEDIUM_POST> <PATH_TO_YOUR_NEW_POST_FILE>

// Example
npm run convert https://medium.com/@jtmuller5-98869/enhanced-enums-in-flutter-3-c6b6b4716e43 > /Users/josephmuller/Dev/apps/jtmuller5.github.io/content/posts/enhanced_enums/enhanced_enums.md
Add your Social Links
![]()
To add social links to your blog’s header, add the following to the params list in your config.yaml:
socialIcons:
    - name: twitter
      url: "https://twitter.com/<username>"
    - name: stackoverflow
      url: "https://stackoverflow.com/users/<username>"
    - name: github
      url: "https://github.com/<username>"
    - name: linkedin
      url: "https://www.linkedin.com/in/<username>/"
    - name: buymeacoffee
      url: "https://www.buymeacoffee.com/<username>"
    - name: kofi
      url: "https://kofi.com/<username>"
You can find all available social icons here.
Add Tags and Categories to your Post
Hugo comes with two built in taxonomies: tags and categories. You can easily add tags and categories to a post by adding the following lines to the top of that post:
---
title: "Build this blog"
date: 2022-09-17T16:26:21-04:00
draft: true
categories: ["tutorials"] // Add this
tags: ["blogging","self-hosted"] // Add this
---
Add Google Analytics
Hugo has internal templates for Google Analytics tracking.
- Create a Google Analytics account here: https://analytics.google.com/
- Select the “Admin” icon along the side bar
- Create a new property. Give it a name, a category, and select how you intend to use Google Analytics
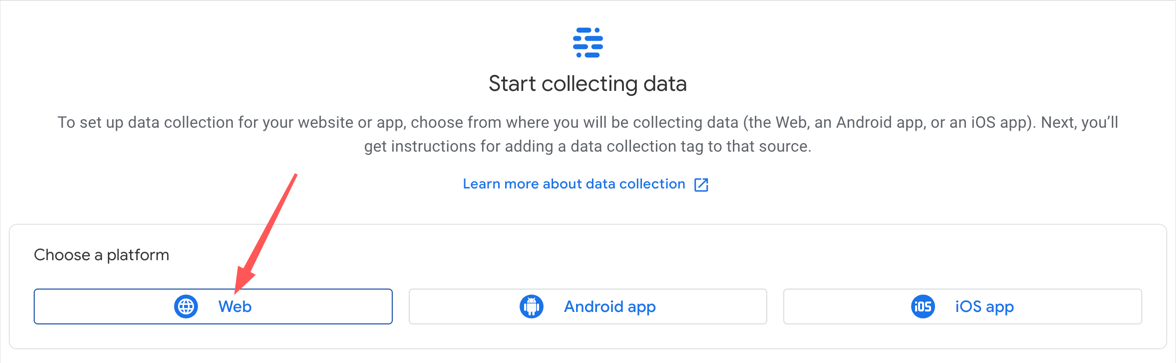
- Select “Create”. On the next screen, select the “Web” option
- Add the name of your GitHub site in the Website URL field (ex. jtmuller5.github.io)
- Name the stream and select “Create Stream”
- Locate the Measurement ID and copy it. In GA3 this was known as the Tracking ID
- In your repo, add the following line to your config.yaml
googleAnalytics: <MEASUREMENT ID>
The PaperMod theme includes a head.html file in
<ROOT>/themes/PaperMod/layouts/partials/head.html. This file includes the code required to add Google Analytics tracking in a production environment